under construction
This page will help you build a gsm ground station for AirWhere. This will enable a ground station to be placed anywhere where there a mobile phone signal. Connection to the Internet is done by using a sim card to any network .
Required Knowledge & Equipment
The install and setup procedure just requires basic computer knowledge, how to download files, install software and make a brew while you wait.
Hardware needed is :-
- ESP8266
- SIM800L
- 2xLeds
- 2x 330 Ohm resistors
- sma connector
- Ground station antenna
- Mobile antenna
- 3.7V Power source capable of a 2amp peak
Step One.
Firstly before you start you will need to
register an ID for your unit.
| 1.1 | Proceed to the registration page and type in your email and choose a password and press sign up.
You will then receive an email asking you to confirm your email address, if you dont receive one, check spam to see if its there or any other issues - contact us.
|
| 1.2 | Once you have verified your email proceed to log in and then press add ground station and add your details
Your AirWhere manufacturer should stay at 04 and you can choose an ID for yourself, its 4 digits from 0001 to FFFF, but dont worry about the letters, just choose a 4 digit number if you like - eg 2345.
This will now be your ground station number.
|
Step Two.
The main item after the parts above ou will need is power - a large battery will do several days however solar power is worth thinking about or perhaps running off a car battery and a 12v mobile phone charger. This should give many days of power and require charging every month or so.
For your information
If you would like a case making for your board - please contact us :)
Step Three.
Once the purchased hardware arrives you will need to install the windows / mac drivers to be able to ‘see’ the board and then install the AirWhere software onto it.
| 3.1 |
Load this page and then download the relevant driver for windows and install.
https://www.silabs.com/products/development-tools/software/usb-to-uart-bridge-vcp-drivers
Some esp8266 boards have a different driver, the amica board has the above driver, the lolin board has a different driver :- download and install from http://www.arduined.eu/ch340g-converter-windows-7-driver-download.
|
| 3.2 |
Extract the zip file to a folder and then run the correct executable in the file.
If your on 32 bit windows, run the exe with 86 in it and if your on a 64 bit windows run the 64 version. Your version can be found in windows device manager.
|
| 3.3 |
Now you should be able to get a micro usb cable and plug your AirWhere board in..
Windows should say its found the hardware and that is now working.
|
| 3.4 |
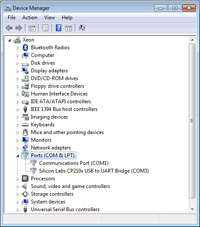
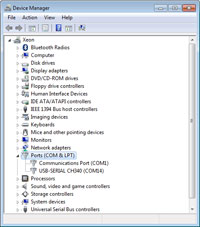
Open windows device manager (control panel – device manager). Find ‘Ports’ you should see a new port there, perhaps com3 or com4 which is your new board.Take a note of this number you will need this in the next step.
|


Programming Files:
| 4.1 |
Create a new folder on your PC.
Name the folder but DO NOT allow any spaces between letters. |
| 4.2 |
Plug the board into the a PC USB port.
|
| 4.2 |
Flashing the board - AirWhere software is loaded as a binary file onto the board using a Flashing program.
This program can be downloaded free .
Download ESP 8266 Flasher and then the AirWhere binary into this folder, unzip the Esp Zip file there
|
| 4.3 |
Navigate to the newly created folder and run the ESP8266Flasher.exe file,
select the com port you have found before in Step 2, click on config at the top, click the little gear icon next on the first line and select the AirWare.ino.bin file you have downloaded. Now return to the Operation tab and press flash .
|
| 4.4 |
After a couple of minutes the board is ready, unplug the board from the USB power supply and plug it back in again.
|
| 4.5 |
If this procedure doesnt seem to work, just try again, sometimes brand new ESP's take a few attempts to flash.
|
| 4.6 |
Take a wifi enabled device and check for a wifi Access Point - Out of the packet it says AL_THINKER_ and then when you have flashed it properly it comes up AirWare-040000.
|
Step Five.
So now you have a working ESP32 board with the AirWhere program.
| 5.1 |
Search for the new device in your wifi settings and connect to it..
You will be asked for default password 12345678. ( this password could have been changed when the unit was built so check with the builder.)
|
| 5.2 |
Now type 192.168.4.1 in your web browser.
If you are using an android phone please switch your data off, android will try look for airwhere on the internet and the connection will take a long time.
You will now see a page titled AirWhere ESP32. This is the configuration page.
|
| 5.3 |
Then use the Configure Pilot Info button to enter your details, enter the ID you registered in step one.
.
When you press ‘Submit’ the device will try to return to the home page but remember you have just renamed it’s identity from what it was originally to say a new Access point with your new ID; so you need to:
|
| 5.4 |
Reconnect this wifi device then refresh 192.168.4.1.
|
| 5.5 |
Click ‘Pilot Info’, input your pilot details, your Wifi SSID and Password..
This will allow you to upgrade the software via your Wifi connection.
|
| 5.6 |
When you’ve completed the settings press submit.
The unit will restart so go back to the home page again once its started.
|
| 5.7 |
Press ‘Configure Hardware’ and under ‘Radio board’ select ‘Heltec (sx1276)’.
the other choices depend on what you are building and have attached.
|
| 5.8 |
Now press switch to ground station mode at the bottom of the page.
(the board will reboot in ground station mode now to let you enter your own details).
|
5.9 |
Now add your lat long to the page, make sure its in the correct format and formatted as per the page says.
Sometimes if the page hangs, refresh your browser 192.168.4.1. You should now be back on the home page for your device. If the page times out, just refresh and it will appear again.
|
| 5.10 |
Make sure your ID and wifi router details are still in there and correct, it should say Internet connected.
Now press submit and wait for the unit to come back online. It should appear now on the live tracking page ( press refresh ) and if you have an airwhere unit in distance this should appear on the tracking and the R value on the screen increment.
|
| 5.11 |
If you wish to have a logging page which will keep track of everything your ground station can see,please contact us and we can set this up for you. Hopefully soon this will be automatic.
|
Step Six.
| 6.1 |
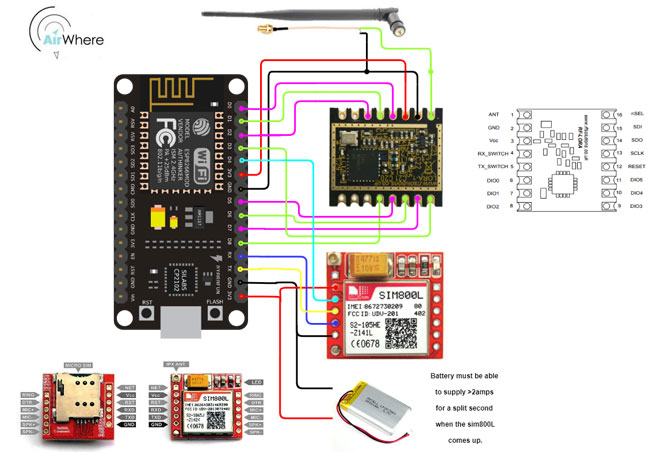
Follow the wiring diagram to setup the AirWhere & Lora board.
a breadboard can be used to temporarily check the system works ok, however soldering gives a better joint.
System

| ESP32 | Lora board | Aerial | Power LED | TX LED |
| IO2 | 6 | | | |
| IO4 | 16 | | | |
| IO15 | 12 | | | |
| IO16 | 5 | | | |
| IO17 | 4 | | | +ve |
| IO18 | 13 | | | |
| IO19 | 14 | | | |
| IO23 | 15 | | | |
| IO33 | | | | |
| 3V | VCC | | +ve | |
| GND | GND | Outer | -ve | -ve |
| USB | | | | | |
| 1 | Inner | | |
|
Step Seven.
| i |
Install the airwhere setup into a box now and then prepare to install. |
| ii |
Installing the antenna is usually straight forward, choose the highest point where it can be physically located Most people just attached to the tv mast and then run cable through the slates to the roof space where the airwhere unit can live. |
|
| iii |
Please visit the antenna page for more info on antennas. |
PreAmp
| i |
A preamp can be added to your ground station setup.this usually doubles the range of your ground station, it is definately worth adding and its not too expensive. The site selling these is UPtronics. Contact us for a discount code for our project !
|
Please if you do build an AirWhere in this way, as it is so cheap and easy to do please do donate a contribution to the project, the project has taken 2 years and thousands of hours of work to get to here and we have to pay for server fees - many thanks. Our paypal is phil@air-ware.co.uk for any donations to keep this project alive :)
Have fun with the project!

